Tile Installation: The Entire Process Step by Step

Materials, techniques, expert tips, and key insights
Even though tile installation is typically carried out by professional installers, it is a process every homeowner should be familiar with—whether for planning purposes or simply to understand the stages of such a renovation.
Even if you're not a pro, having some basic knowledge will help you make better decisions. After all, knowledge is power—and trade secrets are no longer a mystery. Although tile installation isn’t especially difficult, it does require experience, good communication with your installer, and attention to detail that can make or break the final result.
Choosing Tiles and Adhesive
When selecting tiles and the appropriate adhesive, it’s important to consider both the space and its intended use. For example, in bathrooms or kitchens where moisture is high, it’s essential to choose tiles with anti-slip properties and adhesives that resist water and heat.
There’s a huge variety of tile types (ceramic, porcelain, natural stone) and patterns. Neutral, earthy tones and timeless, minimalist designs help ensure your tiles won't look dated in a few years.
Regardless of your tile choice, you should use top-performing, flexible adhesives like FixoTile Flex 30 (resin-enhanced, flexible, high-performance cement-based adhesive) and FixoTile GEL MAX (a hybrid, resin-cement adhesive with GEL technology).
Surface Cleaning
One of the most critical steps before tile installation is thoroughly cleaning the floor to ensure proper adhesion and avoid future issues. Make sure the surface is free of dust, oil, and debris.
How to clean:
Vacuum the area first, then wash with a floor cleaner or soap and water using a brush and sponge. Dry the surface with a towel or cloth and allow it to completely dry before moving on.
Warning: If any moisture or cleaner residue remains, the adhesive may not bond well, potentially leading to loose tiles or cracks over time.
Waterproofing
Waterproofing is essential, especially in high-moisture areas like bathrooms, kitchens, or basements. The goal is to prevent water or humidity from seeping beneath the tiles, which can cause major damage to the surface and structure.
Use a flexible waterproofing system such as Hydroguard Elastic System on the floor and walls. Be sure to cover the entire area thoroughly, leaving no gaps, and let it dry fully before tiling.
Poor waterproofing can lead to tile detachment, mold growth, or surface deterioration.
Applying Tile Adhesive
This step ensures strong tile adhesion. Proper choice and application of adhesive—along with the right amount—is key for long-lasting results.
Examples:
FixoTile Flex 30 is ideal for large tiles and offers strong adhesion and moisture resistance.
FixoTile Ultra 20 is user-friendly with excellent bonding and no slip.
FixoTile GEL offers great workability and ease of application, suitable for underfloor heating and high-demand areas.
Adhesives are usually powder-based and mixed with water. The amount needed depends on tile size and surface area—larger tiles require more adhesive. For 1 m², typically 3–5 kg of adhesive is used.
Tip: Don’t over-apply. Follow the manufacturer’s instructions for mixing ratio to achieve the correct consistency.
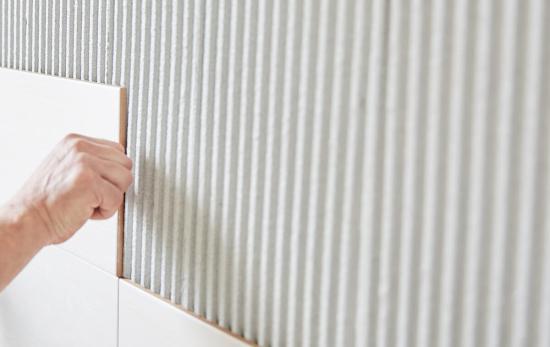
Use a notched trowel to spread the adhesive in even, straight lines over about 1 m² at a time, to avoid premature drying.
Tile Placement
This is the most critical phase. Start from the center of a large surface and work outward.
Place each tile gently on the adhesive, pressing slightly for full contact. Use tile spacers to keep spacing even between tiles and ensure proper alignment.
Corners matter: Maintain consistent spacing even when cutting tiles to fit. A tile cutter, electric saw, or manual tile cutter may be used. If possible, choose tile dimensions that match your space to avoid cuts.
Grouting
Grouting fills the spaces between tiles after the adhesive has dried (usually the next day).
Use a high-quality grout such as FixoGrout One 0-8, a cement-based, water-repellent, colored grout with abrasion resistance and smooth finish (Hard Velvet Effect).
After removing spacers and cleaning the joints, apply grout with a spatula, pressing firmly into the joints. Wipe off excess and allow it to dry.
Final Steps
After grouting, wait for it to fully cure—usually 24 hours—before applying any weight or walking on the surface.
Once dry, wipe tiles with a damp sponge or cloth to remove grout residue. Allow the surface to dry completely—and you're done!


